
Rapira
Account settings
Register on the website: rapira.net
Login to your account, go through verification and enable two-factor authentication.
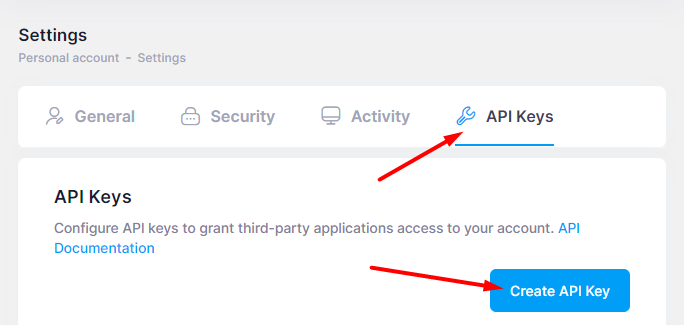
Go to the Settings - API keys section and click the Create API key button.
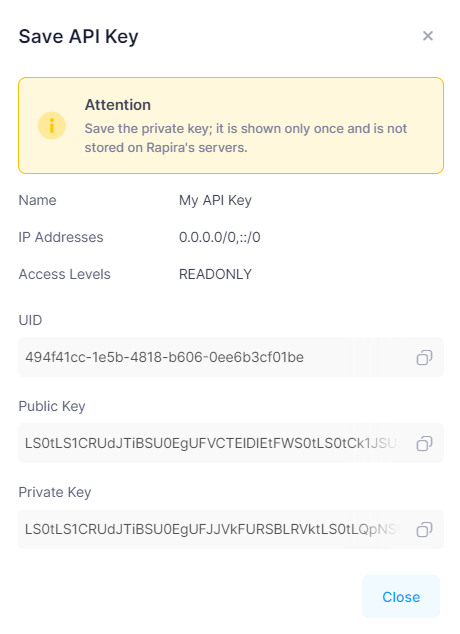
Enter the two-factor authentication code and confirm the creation of keys.
In the window that opens, save the UID and Private key, they will be needed for settings in the admin panel.
Settings in the admin panel
By default, the payment system is disabled.
Go to settings Currency exchange - Payment systems - Disabled - Rapira USDT
Settings only for types: Semi-automatic
UID - API identifier from the keys page of your Rapira account Private Key - private API key obtained when creating keys Network - a network for multi-network currencies. Possible values: Bitcoin, BNB, TRC20, Toncoin, BEP20, ERC20. Leave blank if network selection is not needed. Save the settings.
Supported currencies
USDT - Tether BNB - Binance Coin BTC - Bitcoin DAI - Dai Stablecoin ETH - Ethereum LTC - Litecoin TRX - Tron USDC - USD Coin
Adding a new payment system based on the Rapira API. In Bitcoin example
Name of payment system - Any System type - Electronic currency Currency name - BTC Identifier - any free API - select bitcoin_rapira System currency - select BTC - Bitcoin UID - take it from the API key settings page of your Rapira account Private Key - enter the private API key received when creating keys Network - leave empty Save the settings.
CRON
To automate the processing of incoming transactions, you must activate CRON "Rapira Transactions Processing"
For more stable operation, you can activate server CRON with the command:
wget -O /dev/null -q 'http://yoursite.com/cron.php?action=rapiraprocess'
yoursite.com replace with the address of your site
Other settings
For a description of other settings, see the section: Payment systems
Last updated